Build and adjust the route
The map is part of both Add voyage and Edit voyage. It draws the voyage as an ordered line from the first route point to the last, so the position and order of every marker affect the displayed track and calculated distance.
Pan the map until the centre crosshair is over the required position, then choose Add route point. The new point is inserted before an existing arrival point. You can also search My Marine Locations above the map to move the map to a saved location before adding a point.
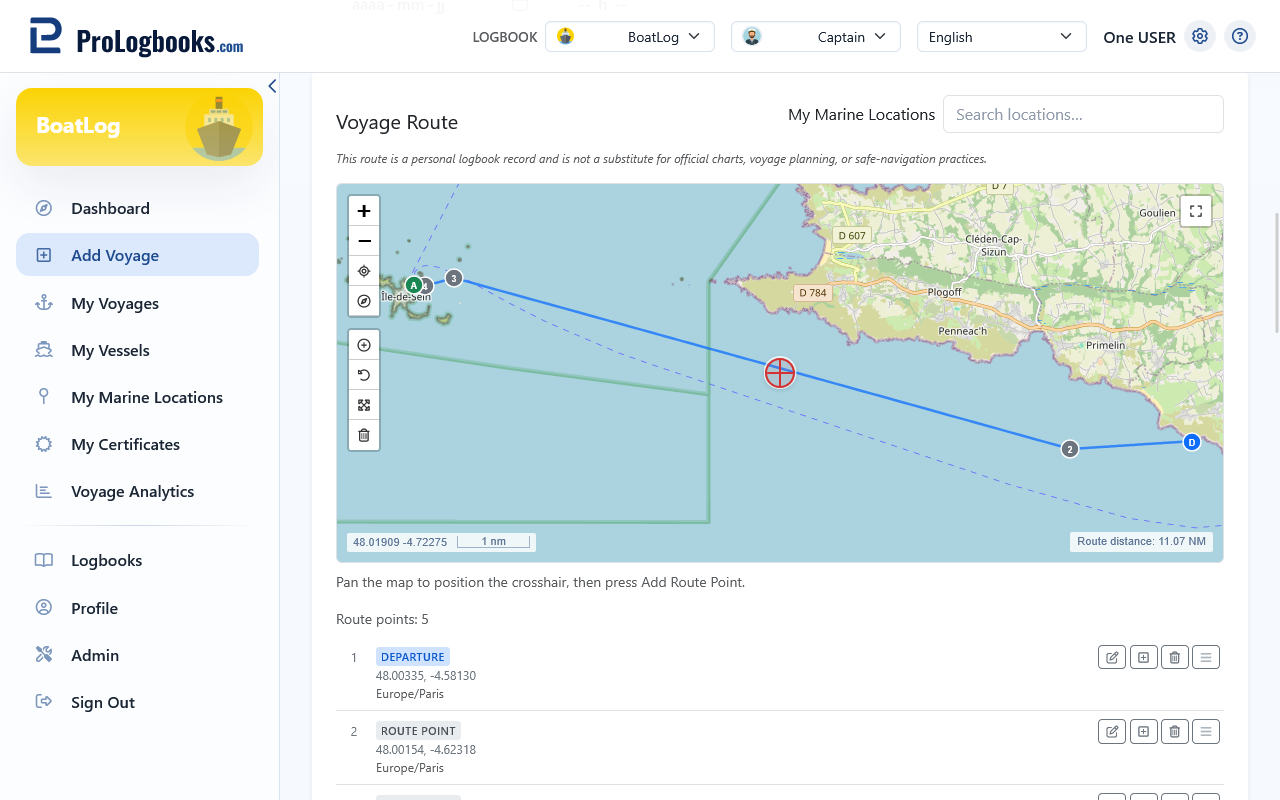
- Enter or select the departure and arrival locations so their coordinates can become the route endpoints.
- Pan and zoom the map until the crosshair shows the position for the next route point.
- Choose Add route point, then repeat for the intermediate positions in travel order.
- Use Fit route to frame all recorded markers and check the complete track.
- The coordinate readout below the map controls follows the centre crosshair.
- My location centres the map on the browser location when permission is available; it does not add a point automatically.
- Undo reverses the latest route edit. Clear intermediate points keeps the first and last points and removes the points between them after confirmation.
- The editor accepts up to 500 route points for one voyage.
Move markers and reshape the track
Every visible route marker is draggable. Drag a marker directly to correct its geographic position; the route line follows the marker while it moves. When you release it, the coordinates are saved in the route draft and the point timezone lookup runs again.
Departure and arrival use the D and A endpoint markers. Dragging either endpoint updates the matching latitude and longitude fields in the Departure or Arrival card. That coordinate change also starts country retrieval for the endpoint, so the displayed country can change after a short delay.
- Zoom in far enough to distinguish the marker you need.
- Press and drag the marker to its correct position.
- Release it and wait for the route line, coordinates, and route distance to refresh.
- For a departure or arrival marker, confirm the updated coordinates and country in the corresponding form card.
- Open the point again and verify its timezone and time after any substantial move.
- Country retrieval applies to the voyage departure and arrival coordinate pairs, not to every intermediate route point.
- Country retrieval uses an external reverse-geocoding result and can remain blank if the service cannot identify the position.
- An ordinary route point clears its previous timezone when its marker is released, then requests the timezone for the new coordinates.
- Always verify automatically retrieved country and timezone information, especially near borders, coastlines, and timezone boundaries.
Change route order and insert missing points
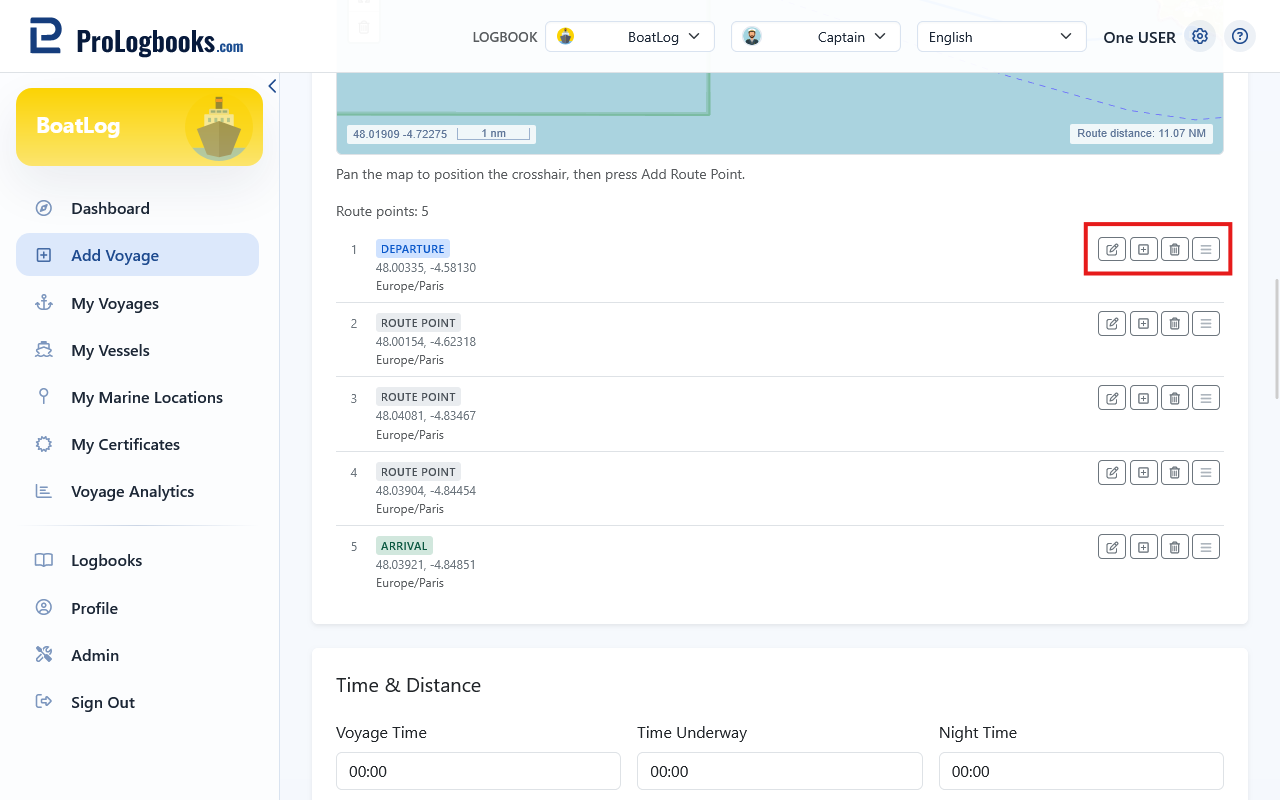
The Route points list below the map is the authoritative travel order. Drag a list item by its drag handle to another position; the point sequence, connecting line, and mapped distance are recalculated immediately.
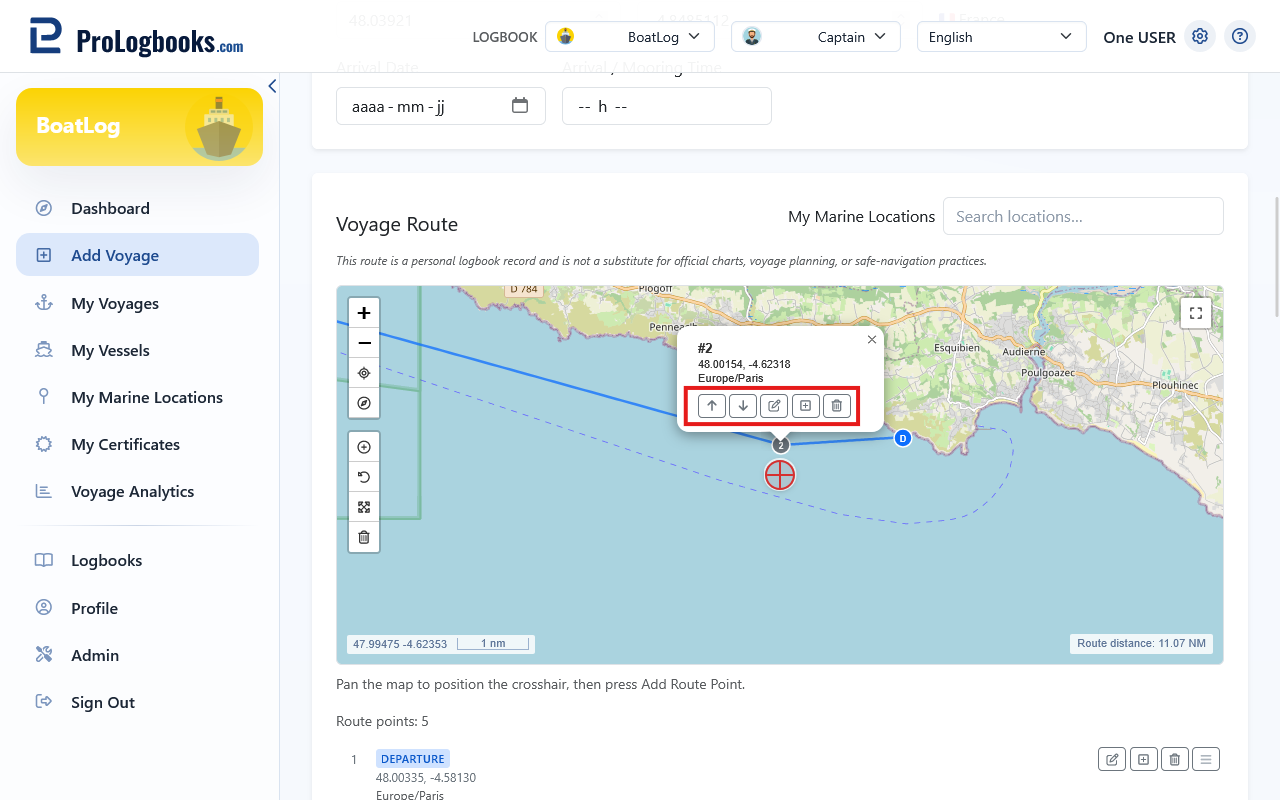
A point popup also provides Up, Down, Insert After, and Delete actions. On desktop, left-click a marker to edit it and right-click for its action popup. On a phone or tablet, tap once for the popup and double-tap to edit. On desktop, you can also right-click a route leg to see its distance and choose Add point here.
- Find the point in the Route points list.
- Drag its handle above or below another item to change the sequence.
- Check that the connecting line now follows the voyage in the correct order.
- Use Insert After or Add point here when a position is missing between two existing points.
- Delete an incorrect point only after confirming that the remaining sequence is still complete.
Set the meaning of each route point
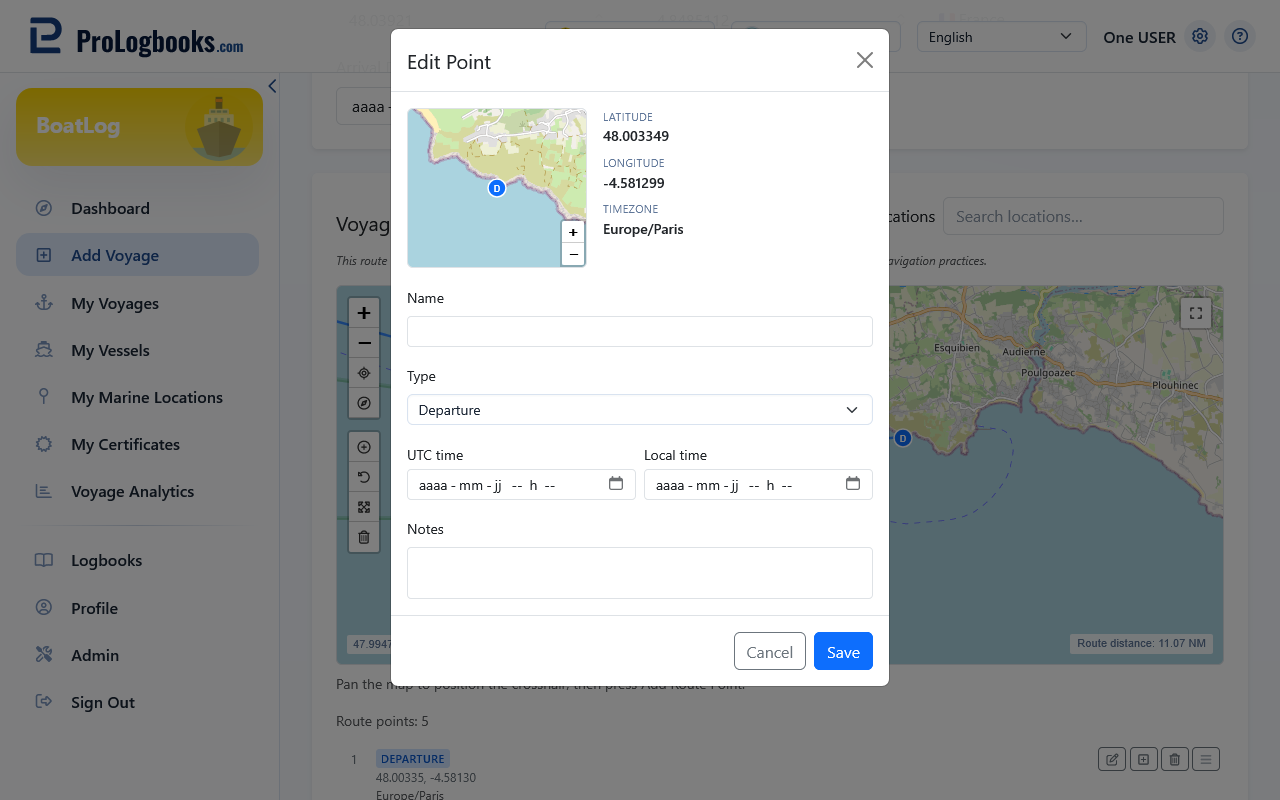
Open a marker to edit its name, point type, recorded time, and notes. Available types are Departure, Waypoint, Route point, Anchorage, Stop, Arrival, and Other.
Changing a point to Departure moves it to the start of the Route points list and changes any previous departure into a normal route point. Changing a point to Arrival moves it to the end and changes any previous arrival into a normal route point. The promoted point coordinates are also synchronized to the matching voyage form card.
- Open the marker edit dialog.
- Enter a meaningful name when it helps identify the point.
- Select the point type that describes what happened at that position.
- Add a recorded time and notes when they form part of the voyage record.
- Choose Save and verify the marker label and its position in the Route points list.
- Use Waypoint or Route point for positions passed during the voyage.
- Use Anchorage or Stop when the vessel remained at that position.
- Name important imported points before saving, such as a fishing spot, anchorage, stop, hazard, or personal reference point.
- Keep one Departure at the beginning and one Arrival at the end for a complete point sequence.
Record point time in UTC or local time
A route point stores its recorded timestamp in UTC. The marker popup and Route points list therefore show the saved value with UTC, followed by the detected IANA timezone when one is available.
The edit dialog provides linked UTC time and Local time fields. Entering UTC updates the local display. When the point has a detected timezone, Local time is enabled and entering a local date and time converts it back to the UTC value that will be saved. Local time remains disabled when no timezone is known.
- Open the route point after its position and timezone have been resolved.
- Enter the event date and time in UTC, or enter Local time when that field is enabled.
- Check the automatically converted value in the other field.
- Save the point and confirm that the Route points list shows the expected UTC timestamp and timezone.
- Moving an ordinary route point requests a new timezone because the applicable local offset may have changed.
- Daylight-saving and historical offsets are applied by the browser for the selected date and detected timezone.
- If the timezone is missing or looks wrong, verify the coordinates first; use UTC as the reliable entry field.
- When a Departure or Arrival point supplies a recorded time, the voyage form fills its corresponding date and time only when those form fields are empty. Review those form values before saving.
Understand voyage-time and distance recalculation
Dragging, adding, deleting, inserting, or reordering route points recalculates the approximate mapped distance along the new point sequence. The result is shown on the map and copied into the voyage Distance (NM) field.
Route-point timestamps do not calculate Voyage time directly. If Voyage time is left blank, saving the form calculates it from the Departure Date and Cast-Off Time to the Arrival Date and Arrival / Mooring Time. When no arrival date is supplied and arrival time is not later than departure time, the calculation treats arrival as the next day.
- Entering Voyage time manually takes precedence over automatic duration calculation.
- If an explicit arrival date and time do not occur after departure, the voyage cannot produce a valid automatic duration.
- Mapped distance is an approximation based on the route-point coordinates, not a certified navigation or instrument distance.
Import an NMEA or GPX track
NMEA and GPX import can read supported route data and turn usable positions into route points. Review the result because source files can contain gaps, duplicate samples, or incorrect timestamps.
After import, open any marker to name important positions such as a fishing spot, anchorage, stop, hazard, or personal reference point. Choose the point type and add notes before saving the voyage.
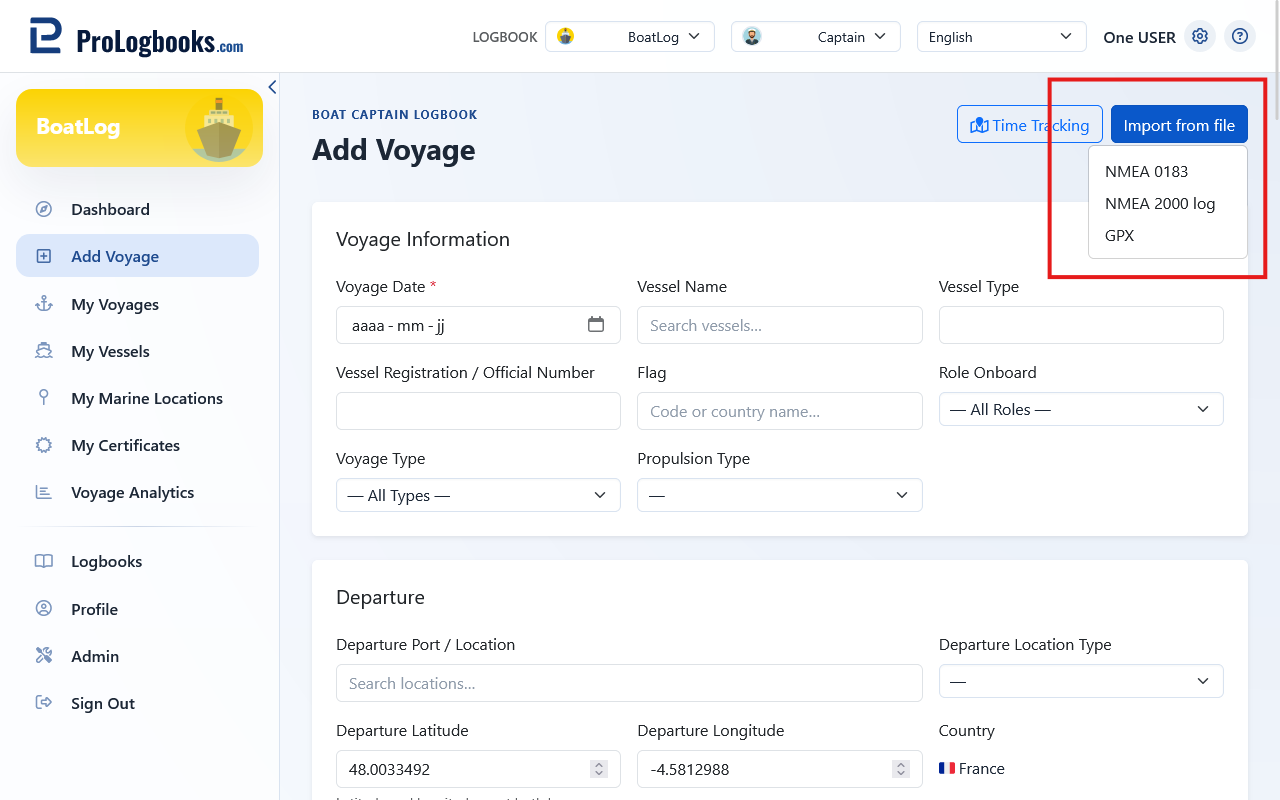
- Choose NMEA or GPX import from the voyage form.
- Select the source file and wait for processing.
- Review the point count, route shape, and times.
- Name the important points you want to recognize later.
- Correct or remove points that do not belong to the voyage.
Review synchronization and distance
The editor synchronizes route endpoints with the voyage coordinates. The route log lists UTC times and timezone information, and the page calculates an approximate distance along the points.
- Calculated distance depends on the recorded points and can differ from an official or instrument distance.
- Keep point times in chronological order and verify timezone information.
- Use current charts, notices, instruments, and official sources for navigation and safety decisions.
If something goes wrong
- If the route endpoints are wrong, confirm that departure and arrival coordinates are valid.
- If the departure or arrival country stays blank after moving its marker, wait briefly, verify the coordinates, and try again; country retrieval depends on the configured reverse-geocoding service.
- If Local time is disabled in the point editor, the route point has no detected timezone. Verify or move the point coordinates, then reopen the editor after timezone lookup finishes.
- If UTC and Local time do not show the expected conversion, confirm the point timezone and date, including any daylight-saving change on that date.
- If dragging a Route points list item does not change the intended leg, use the marker popup Up or Down action and check the route line again.
- If Voyage time is not calculated, leave Voyage time blank and provide valid departure and arrival dates and times with arrival after departure.
- If NMEA import fails, confirm that the file contains supported NMEA 0183 or NMEA 2000 position data.
- If distance looks wrong, check for misplaced, duplicated, or out-of-order points.